Table of Contents
- How to Open the Popup Editor
- General Styling
- Layout & Styles
- Teaser
- Email Opt-in
- SMS Opt-in
- SMS Consent
- Success
- Minimized View
- Settings
- Popup Preview
- Duplicating a Popup
- Managing Your Popups
- Popup Visibility and Cookie Behavior
- What's Next
How to Open the Popup Editor
- In your Recart dashboard, go to Opt-in Tools.
- Click the Name of the Popup you want to edit.
You'll land on the Popup Editor. The left sidebar lists all sections of your Popup — select any section to edit its settings in the right panel.
General Styling
General Styling controls the overall visual design of your Popup in one place — so you don't have to update colors and fonts in every section individually.
Where to find it: Go to Layout & Styles in the left sidebar, then click General Styling.
How to use it:
- Edit Styling — adjust colors, fonts, and layout using the right-side panel, or click directly on elements to edit in place.
- Overwrite styling per step — override General Styling on individual steps when needed (for example, to give the Teaser a different background color).
Note: For newer Popups, General Styling applies globally and updates all steps automatically. For older Popups with already-customized steps, identify any overridden styles in each step and convert them to General Styles from the Layout & Styles menu.
General Styling only affects visuals — content (headlines, body text, legal text) must still be edited within each individual step.
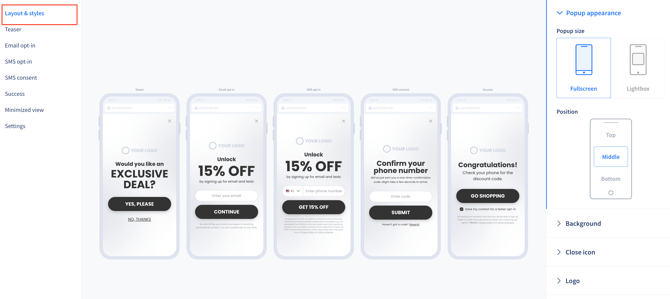
Layout & Styles
The Layout & Styles section controls the overall appearance of your Popup.
- Size and Position — select the Popup size and its placement on screen. For fullscreen Popups, select the content placement. Fullscreen is recommended for higher conversion rates.
- Image or GIF — upload a visual to make your Popup more engaging. Position it above your content or to the side (desktop only).
- Background — set a background color or upload a background image.
- Close icon — appears after a 2-second delay by default. Adjust this to show it sooner, later, or immediately (0 seconds).
- Logo — upload your brand logo. Resize and position it for best visual balance.
- Text — edit headings and body copy to fit your brand voice.
- Buttons — customize your Primary and Secondary button text, colors, and style.
- Input fields — customize how fields look in three states: Default, Active (when typing), and Error (for missing or incorrect input).
- Link field — add or modify link fields. Adjust text, color, and underline style.
Teaser
The Teaser is a hook that appears before your full Popup opens — designed to catch attention and draw visitors in. Testing has shown it increases overall opt-in rates, so we recommend keeping it on.
In this section you can:
- Add and resize your Logo
- Add a Secondary product image
- Edit Headings (text, font, size, color) or import custom fonts via URL
- Add a button group
- Customize Confirm and Decline buttons (text, color, background, border, shape)
Email Opt-in
If you're using a two-step Popup, the Email Opt-in and SMS Opt-in steps are managed separately.
In this section you can:
- Adjust the Popup appearance (same options as Layout & Styles)
- Add and resize your Logo and a Secondary image
- Edit Headings and body text
- Add a form item to collect subscriber details
- Customize the Email input field and CTA button
- Edit your Legal text for compliance
Compliance tip: Always display clear consent language and include links to your Privacy Policy and Terms of Service.
SMS Opt-in
When using a two-step Popup, the SMS Opt-in step is managed separately from Email Opt-in.
Your Email Opt-in settings are copied automatically as a starting point. Customize any element directly within this step to differentiate the SMS experience. You can also edit your Success Message from this section if you're using a two-step Popup.
SMS Consent
If you're using In-Popup Confirmation as your opt-in type, the SMS Consent screen is shown after a visitor receives their one-time code.
You can customize:
- Logo and Secondary image
- Headings and body text
- Code input field, CTA button, and Resend Line
- "Resend Code" text and styling
📖 How to Activate In-Popup Confirmations
Success
After a visitor successfully subscribes, the Success screen is displayed — prompting them to check their phone.
In this section you can:
- Add your Logo and Secondary image
- Edit the Heading and Subheading
- Customize the CTA button:
- Redirect to URL — send subscribers to a product, collection, or promo page
- Apply discount code — automatically apply their discount at checkout
- Add to cart — add a specific product to their cart instantly
- Append to URL — add parameters like a discount code to the current URL
Minimized View
If a visitor closes your Popup, you can display a minimized version so they can easily reopen it.
Configure:
- Enable/Disable — toggle the minimized view on or off for this Popup.
- Behavior — choose whether the Popup reopens full-screen or minimized. We recommend popup to minimized — it lets visitors re-engage without interrupting their browsing.
- Position — select where the minimized button appears on screen.
- Button properties — edit text, font, color, and background.
Settings
The Settings section controls where, when, and to whom your Popup appears.
Connect to a Welcome Flow
Required: Your Popup must be connected to a Welcome Flow. This is what sends the first automated message to new subscribers.
Select an existing flow from the dropdown, or click Create New.
Trigger
| Trigger | When it fires |
|---|---|
| On Page Load | Appears when a visitor lands on the page. You can add a delay in seconds. |
| On Exit Intent | Appears when a visitor shows intent to leave the page. Learn more: Exit Intent Popups |
Pages
- Show on specific pages — restricts the Popup to selected URLs only.
- Hide on specific pages — prevents the Popup from appearing on selected pages.
- Hide site-wide — suppresses all Popups for the rest of a visitor's session once they hit a specific page (useful for post-purchase pages).
Re-engage
Re-engage re-shows your Popup to visitors who closed it but kept browsing — without being intrusive. It only fires after the visitor has navigated to another page and spent active time there.
Recommended: Re-engage is one of the most effective ways to recover missed opt-ins. Enable it for all active Popups.
| Setting | What it does |
|---|---|
| On/Off | Enable or disable Re-engage for this Popup |
| Navigations required | Minimum page navigations before the Popup can re-appear (default: 1) |
| Delay | Active seconds on page before re-showing (default: 40 seconds) |
Tip: Adjust the delay based on your store's average session length. A higher delay means less interruption; a lower delay increases re-engagement but may feel aggressive.
Visitor Targeting
Visitor Targeting lets you control which visitors see this Popup based on whether Recart recognizes them — so you can run parallel Popups for different audiences without overlap.
To enable: toggle Visitor Targeting on in Settings, then uncheck the visitor groups you want to exclude.
| Option | Who it targets |
|---|---|
| New visitors | Visitors Recart has not seen before |
| Recart SMS subscribers | Visitors already subscribed via Recart |
| Klaviyo subscribers | Visitors identified as Klaviyo email or SMS subscribers |
Note: Klaviyo targeting requires an active Klaviyo integration. Visitor Targeting is disabled by default and configured per Popup.
📖 Visitor Targeting for Popups
Geotargeting
Select which countries your Popup appears in. You can only target countries where you have an active phone number set up. Keep the default setup unless you have a specific regional strategy.
A/B Testing
Include your Popup in an A/B test to compare performance between versions.
Popup Preview
Use Popup Preview to test how your Popup looks and behaves before going live.
- In the top-right corner of the editor, click Preview.
- Enter your store URL to load a live preview of your Popup on your site.
- Review the layout, content, and opt-in flow across both Mobile and Desktop.
Tip: Always preview on both Mobile and Desktop before activating — each device uses a separate Popup.
Duplicating a Popup
Duplicating lets you reuse an existing Popup as a starting point for a new one.
- On the Opt-in Tools page, click the three-dot menu (⋯) next to the Popup you want to duplicate.
- Select Duplicate.
- Give the duplicated Popup a name and select its device type (Mobile or Desktop).
- Click Continue to Editing.
Note: The opt-in channels stay the same as the original. If your original Popup collected both Email and SMS, the duplicate will too.
After duplicating, you'll be taken to the Popup Editor to customize the design and attach a Welcome Flow.
Managing Your Popups
From the Opt-in Tools page, click the three-dot menu (⋯) next to any Popup to access these actions:
| Action | What it does |
|---|---|
| Rename | Update the Popup's internal name |
| Edit | Open the Popup Editor |
| Duplicate | Create a copy of the Popup |
| Inactivate | Pause the Popup without deleting it |
Popup Visibility and Cookie Behavior
How visibility works
| Scenario | What happens |
|---|---|
| Visitor completes a Popup | They won't see other active Popups with the same targeting rules on return visits |
| A new Popup is enabled | It will be shown to visitors who were not active when it was first enabled |
| Visitor clears cookies | They are treated as a new visitor — Popups reappear based on your current targeting settings |
These rules apply to both standard Popups and OneClick Popups.
How cookies work
Recart stores cookies for approximately 7 days from a visitor's last interaction (such as a page load). After 7 days, cookies expire and the visitor may see the Popup again.
If a returning visitor subscribes again after their cookies expire, they will not be duplicated in your subscriber list. However, they'll need to resubscribe for cart abandonment automations to continue working, as those flows also rely on cookies.
What's Next
- Review performance — Opt-in Analytics
- Run an A/B test — Popup A/B Testing
- Review compliance and conversion tips — Popup Best Practices
If you have questions, contact our Customer Support team — we're happy to help.