Use Conditional Splits in SMS Flows
How to use the Conditional Split? Reach better results by targeting segmented audiences with personalized messages right from the text editor.
Overview
With the Conditional Split, you can now segment your messages based on your subscribers' behavior. This new feature allows you to create even more targeted and personalized text flows to specific groups of subscribers based on their interests and actions.
The Conditional split will automatically segment your subscribers based on the conditions you are using. For example, let's say you're running a promotion and want to send a different message to subscribers who have already purchased vs. those who haven't. You can use Conditional Split to automatically segment your subscribers into two groups based on whether they've made a purchase, and send them each a tailored message.
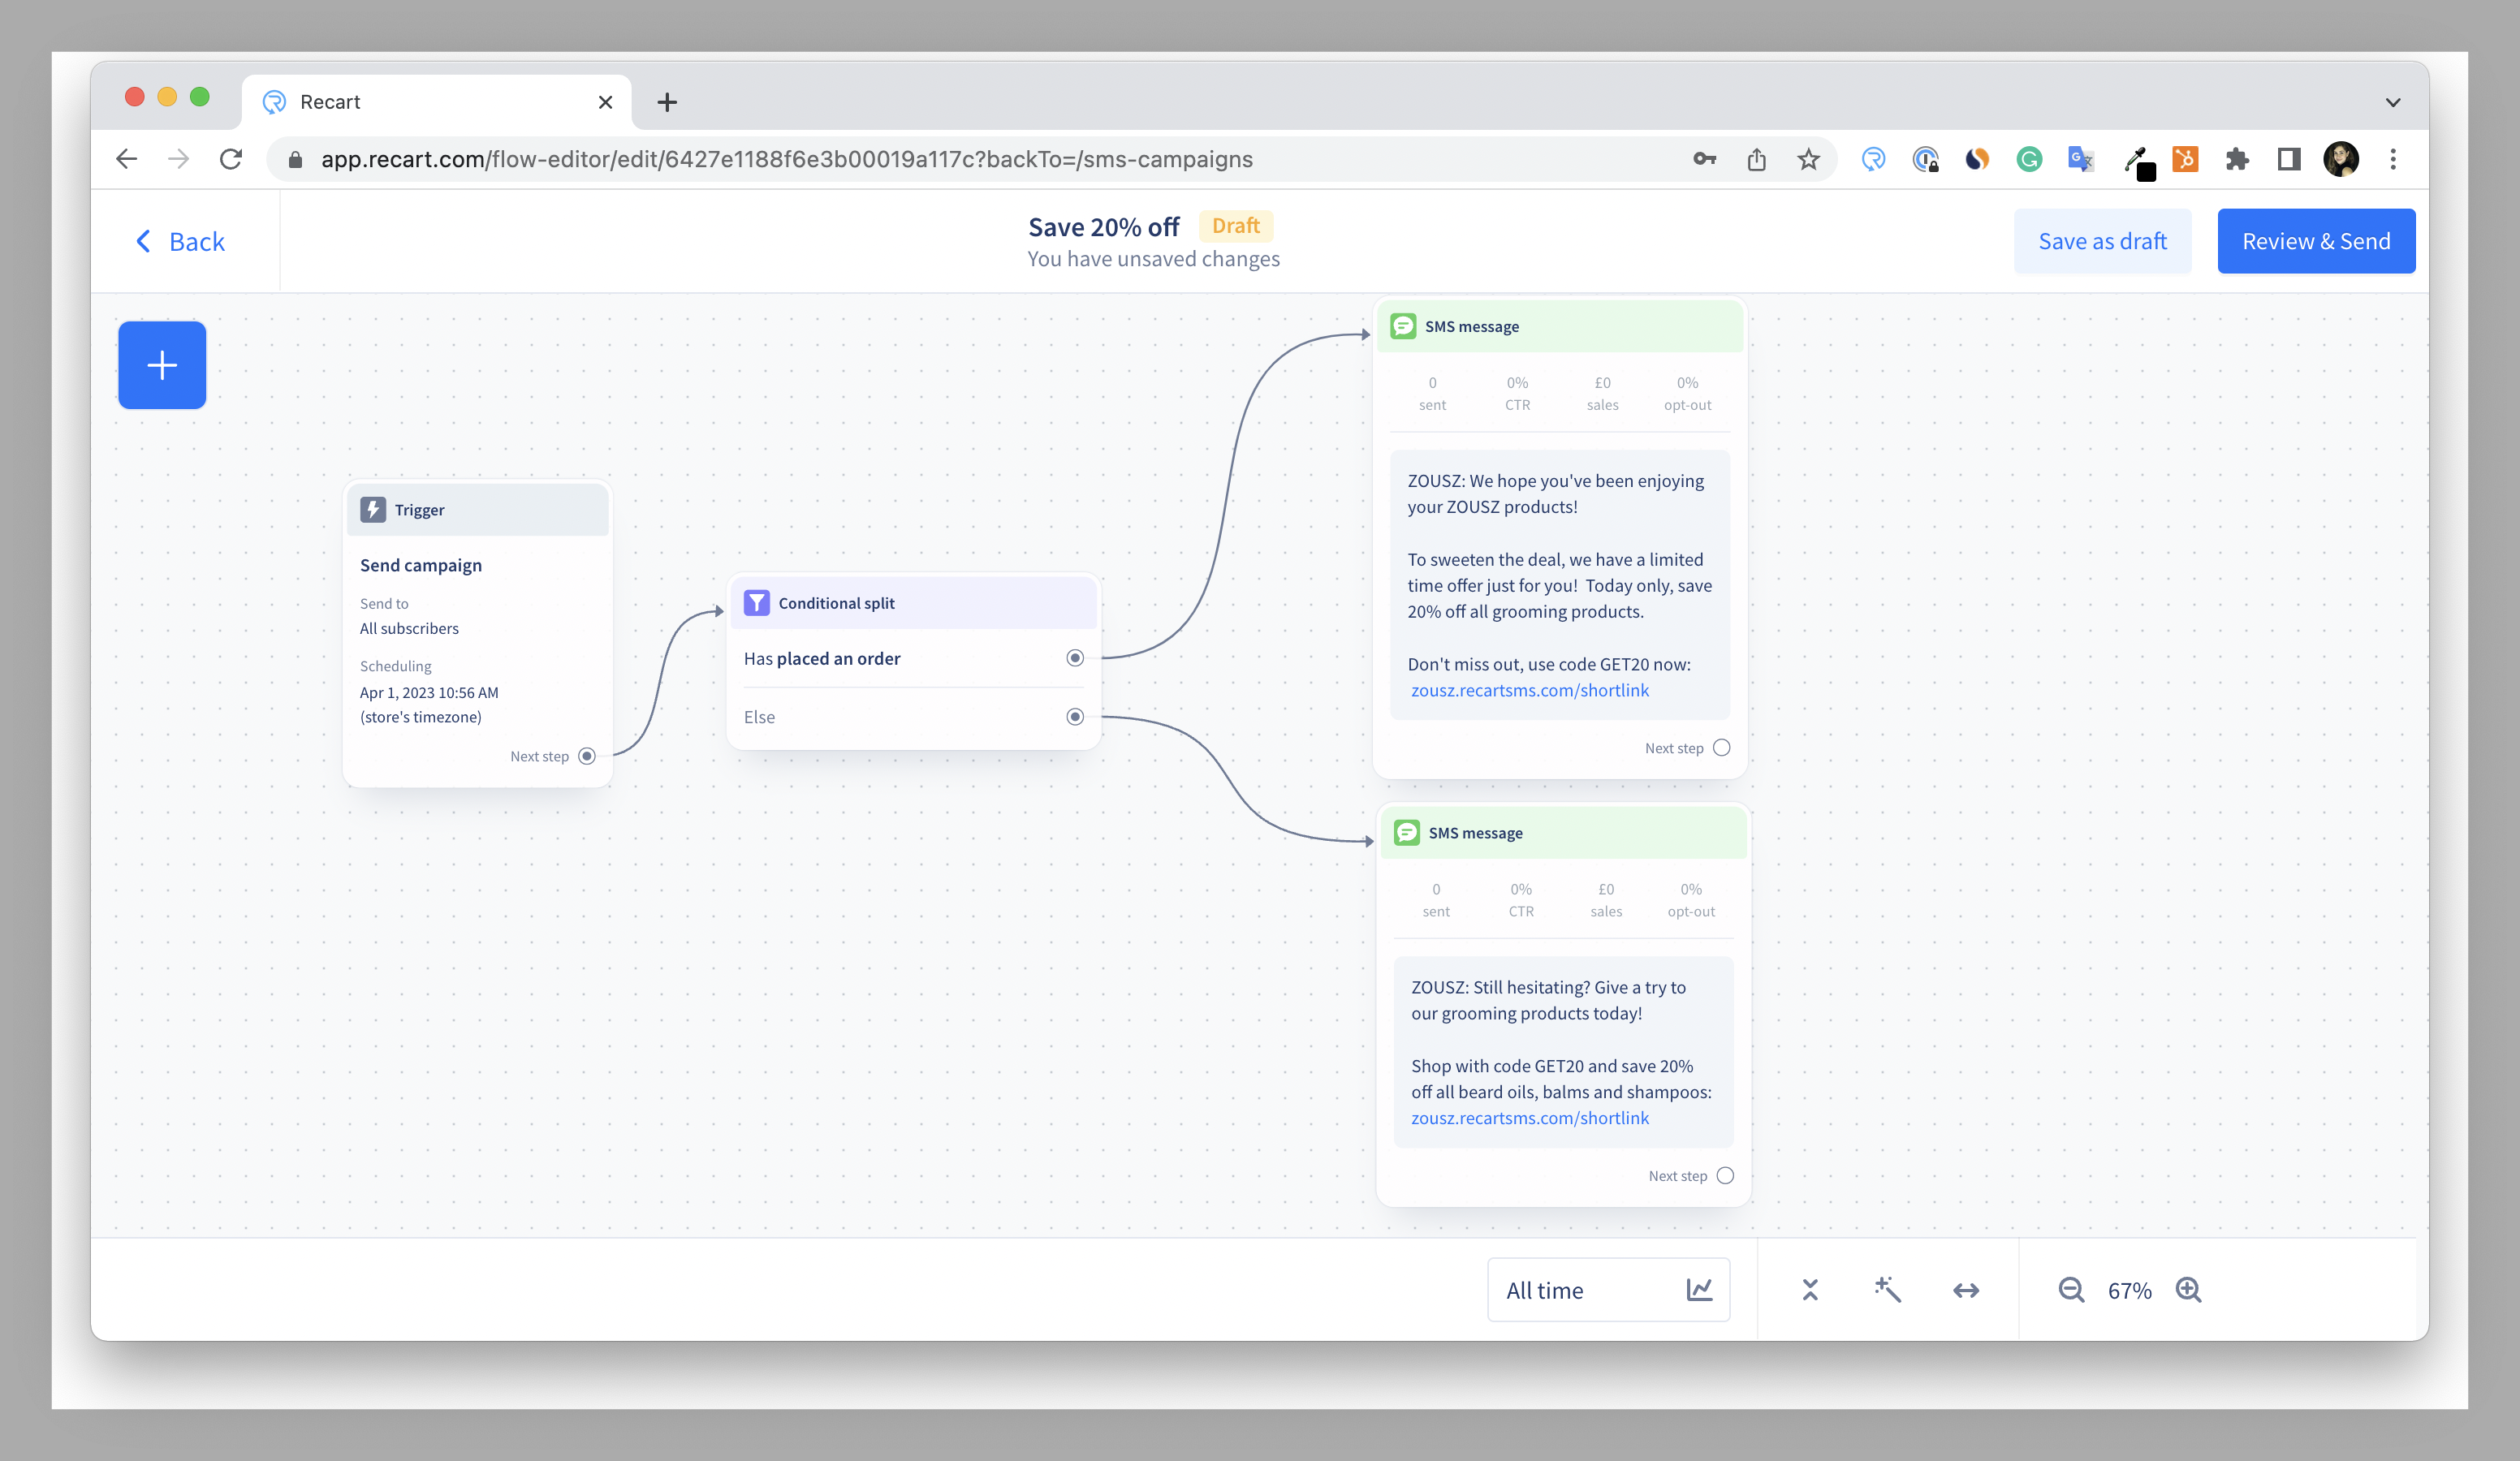
Check this article for more best practices and the most common use cases.
How to add Conditional Split to your texts?
-
Click the blue + button in the upper right corner of the editor.
-
Choose Conditional Split, it will be added to the canvas.
-
Click on it and select the Conditions you’d like to use to segment the audience.
-
Connect the trigger to the Conditional Split, then connect your text messages to the right audiences.
Click the blue + button in the upper right corner of the editor.
Choose Conditional Split, it will be added to the canvas.
Click on it and select the Conditions you’d like to use to segment the audience.
Connect the trigger to the Conditional Split, then connect your text messages to the right audiences.
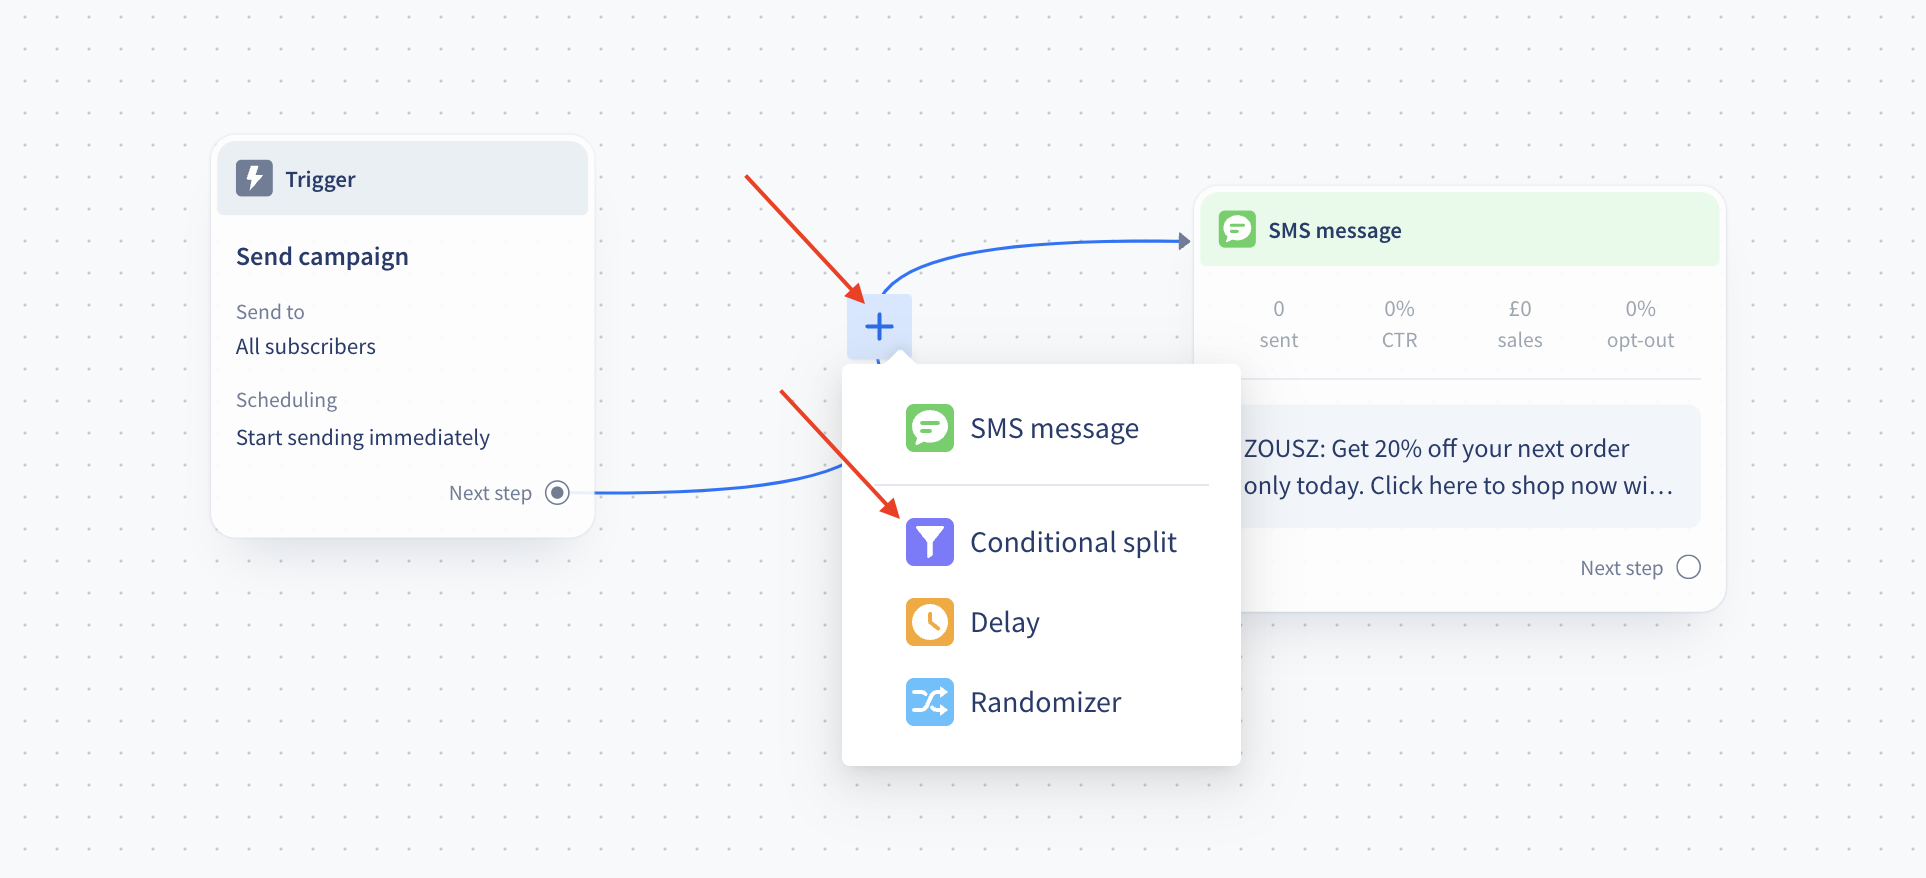
If you are updating existing flows you can also move your cursor to the connection line and click the + button, then chose Conditional Split. This will add a new Conditional Split after the previous flow item.
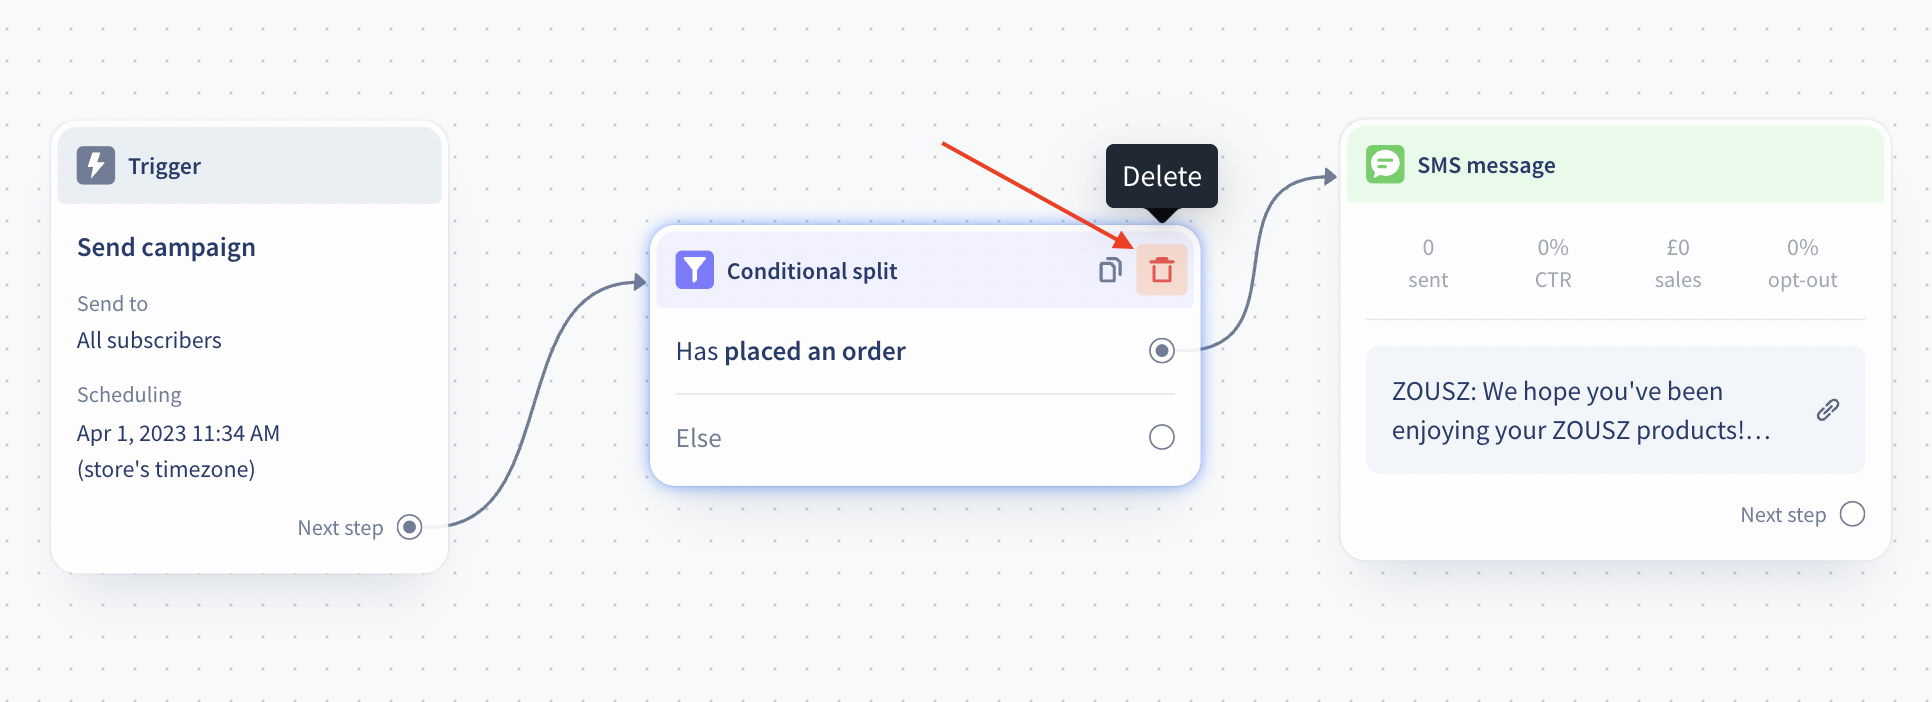
If you’d like to remove a Conditional Split from your flow, click the trash icon on the Conditional Split item.
How does the Conditional Split work?
You can add up to 5 conditions to a Conditional Split, which are essentially like "rules" that your subscribers have to meet in order to receive a certain message.
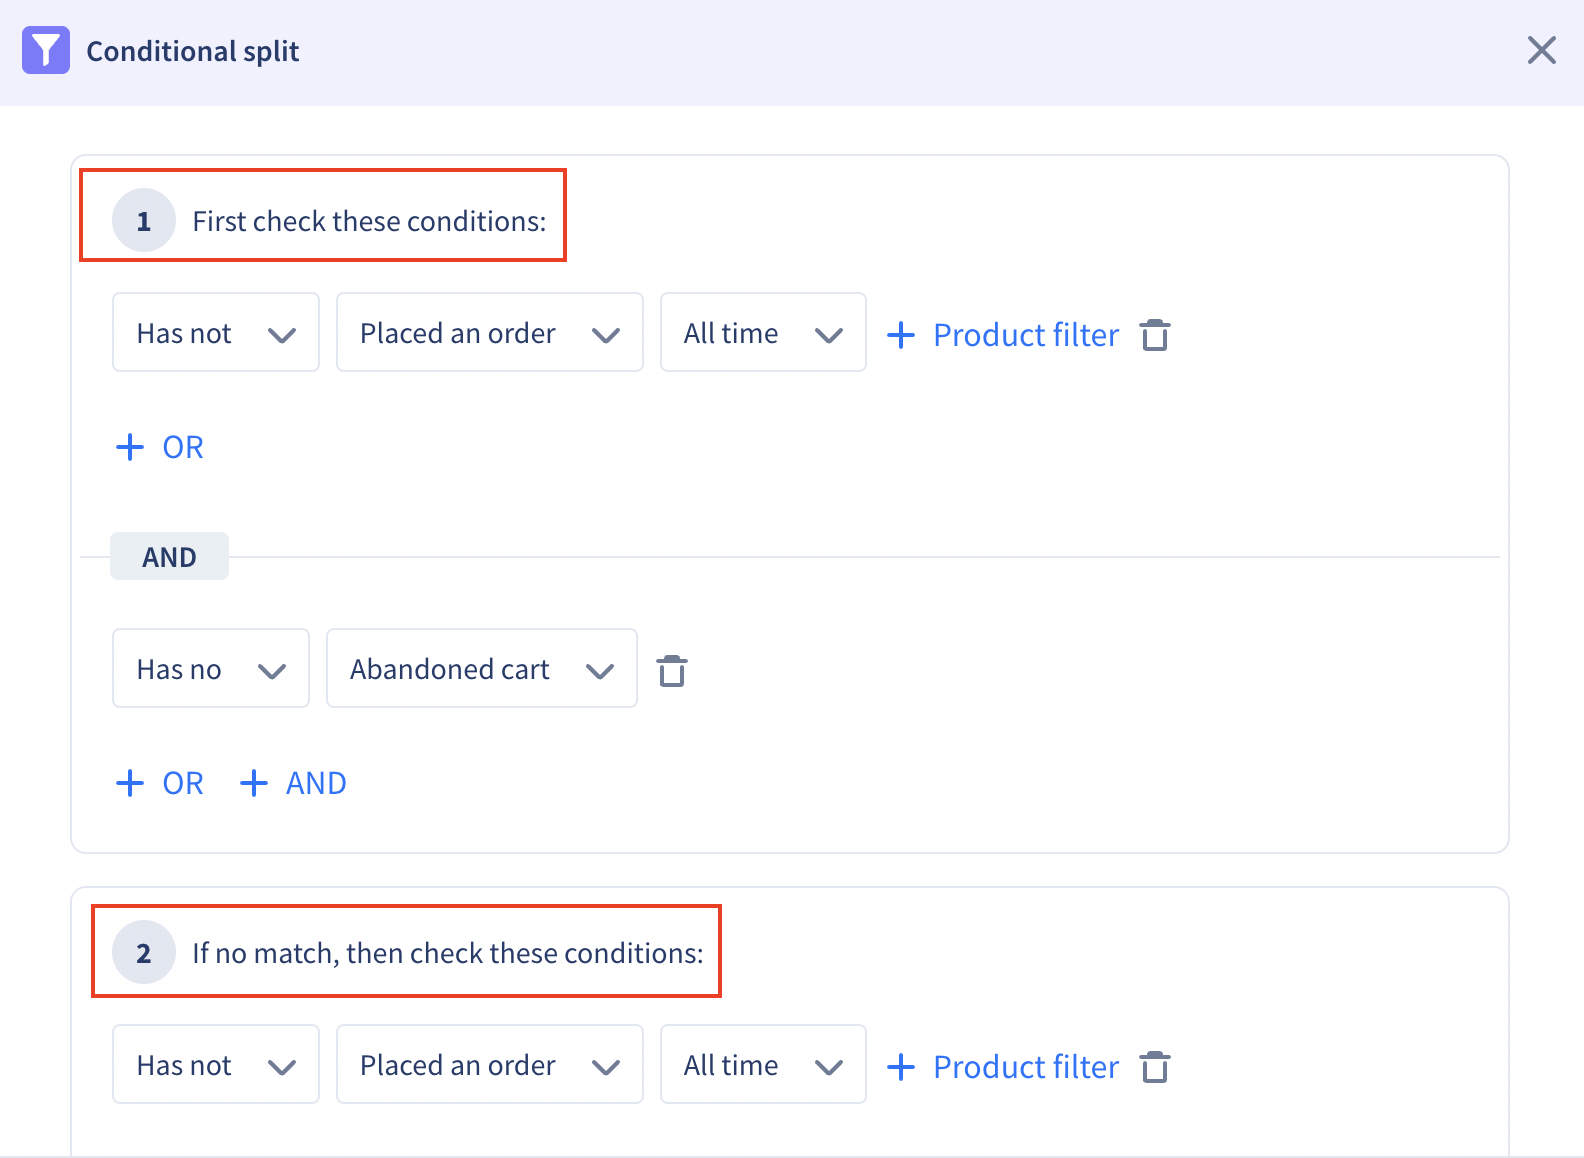
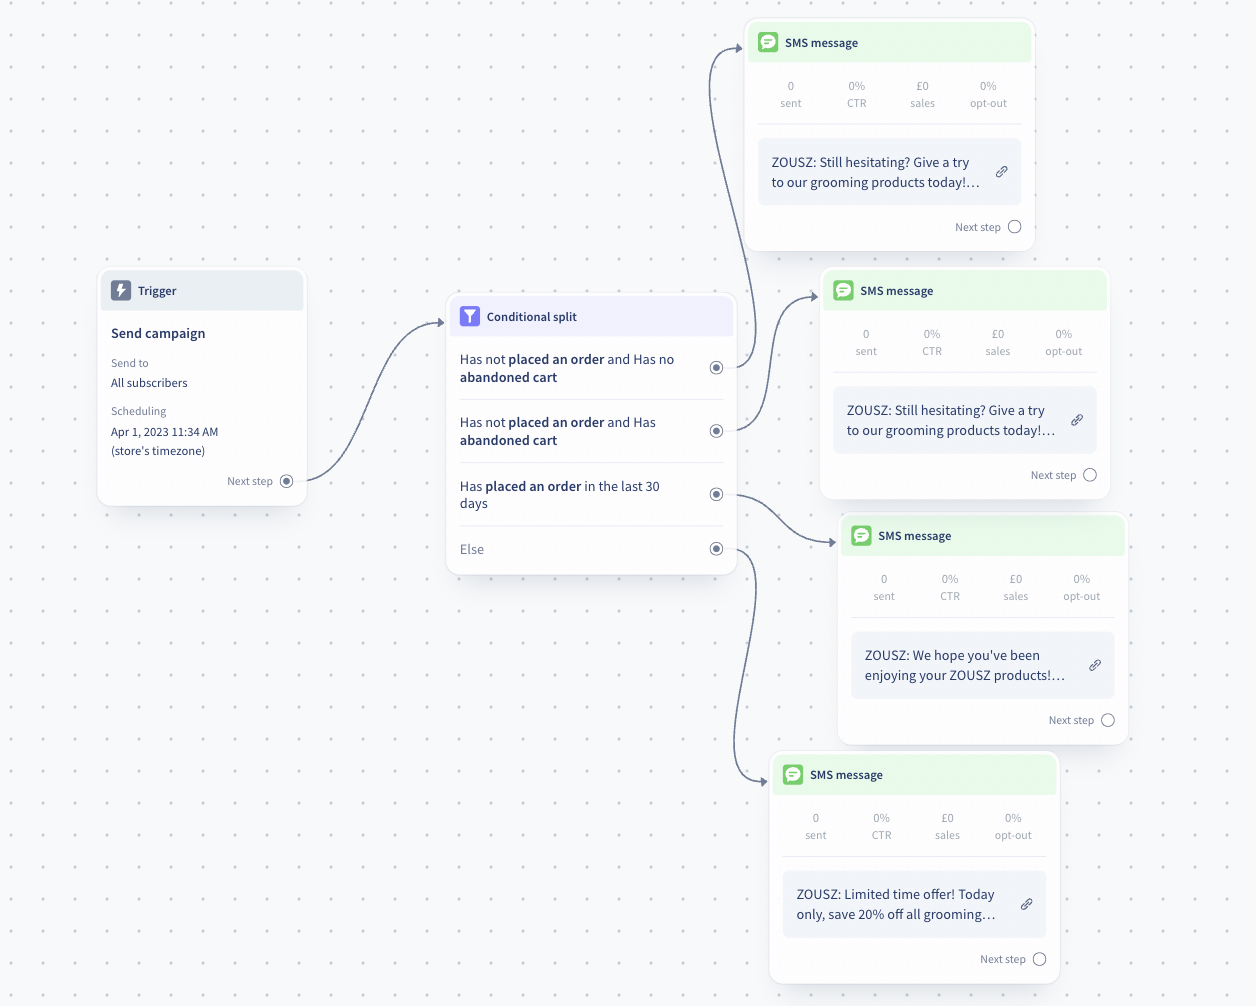
The order of the conditions is important! When you add conditions to your Conditional Split, the app will check each condition in order, starting with the first one you added. See the order on the left side of the Conditional Split editor, as marked on the screenshot above. If the subscriber meets the first condition, they'll receive the message that's associated with that condition. If not, the app will move on to the second condition and check if the subscriber meets that one. This process continues until the app finds a condition that the subscriber meets. If the subscriber does not meet any of the conditions added, they will receive the text associated with the Else option.
Connection rules
Target subscribers who meet the given conditions
Target those subscribers only who meet your criteria by connecting a message to the conditions. When your conditions cover your full subscriber list, eg.: Has placed an order and Has not placed an order, you can skip connecting a message to the Else condition because all your subscribers will receive either the first or the second text based on their purchase history.
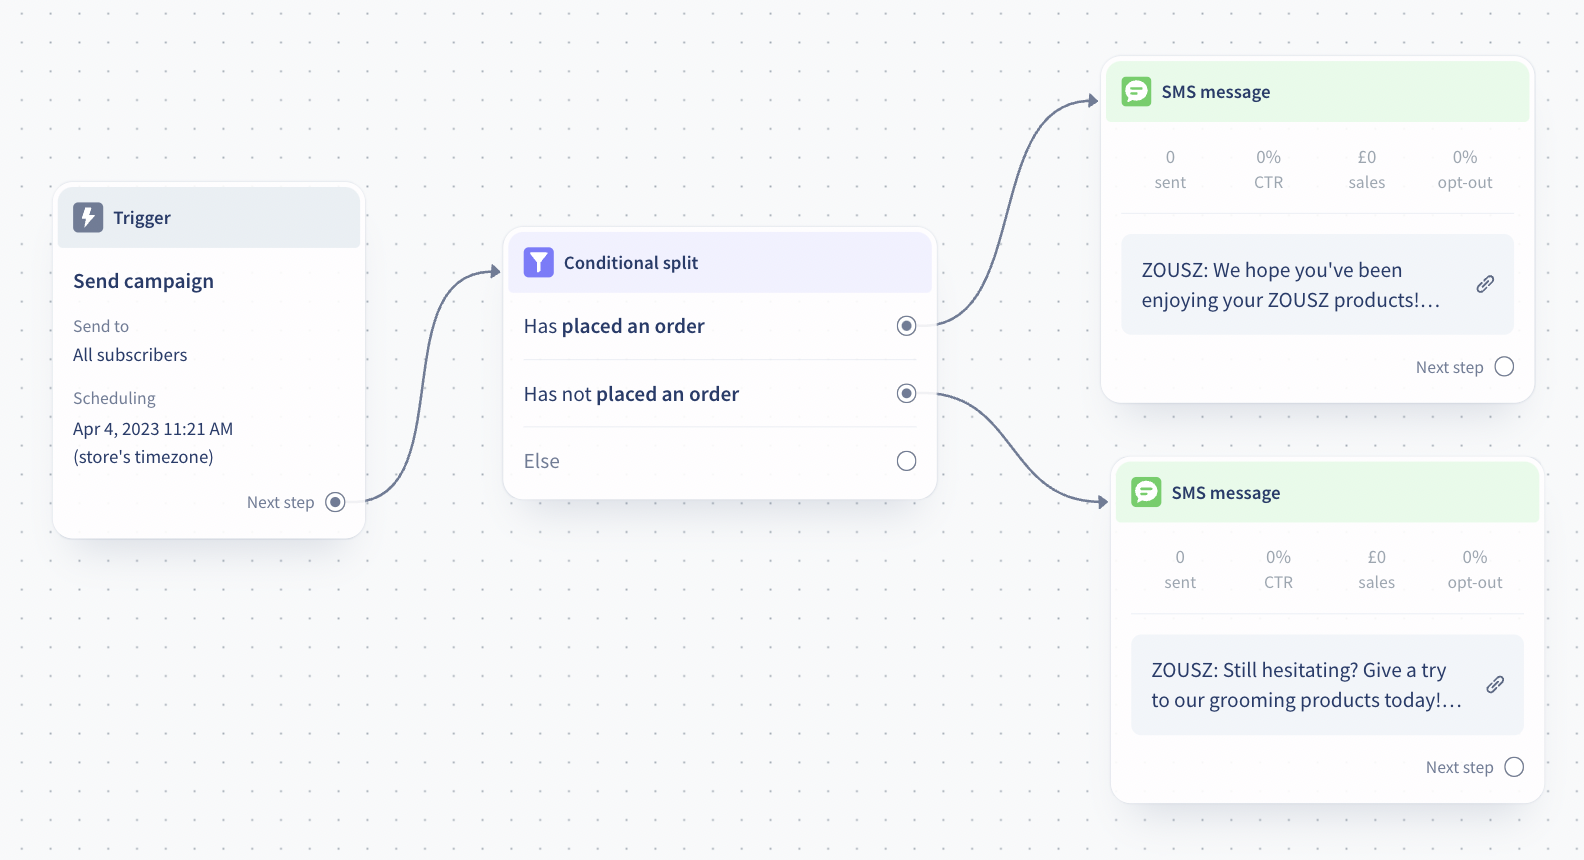
Target subscribers who meet the given conditions and subscribers who don’t separately
Target those subscribers separately who do not meet your criteria by connecting a message to the Else condition.
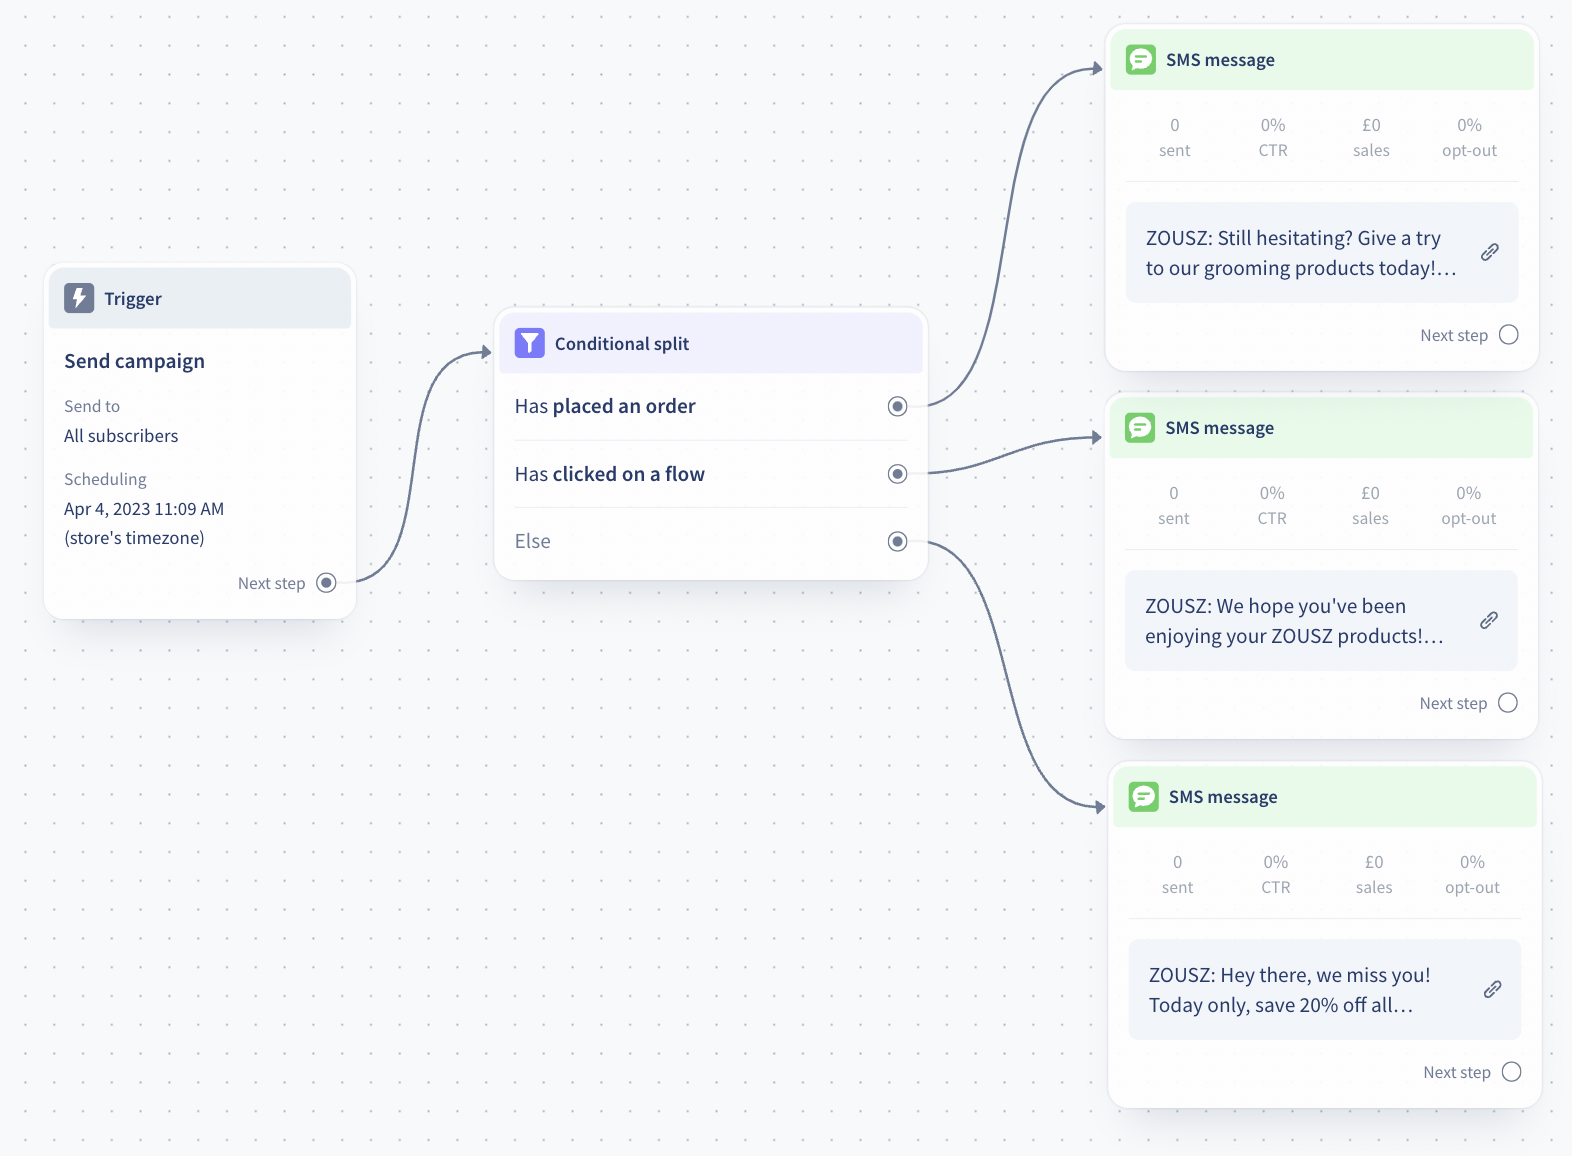
Target subscribers only who don’t meet the given conditions
Exclude certain subscribers from your targeting by using the Else condition alone. Subscribers who meet your conditions will not receive the text.

What happens when a subscriber meets multiple conditions?
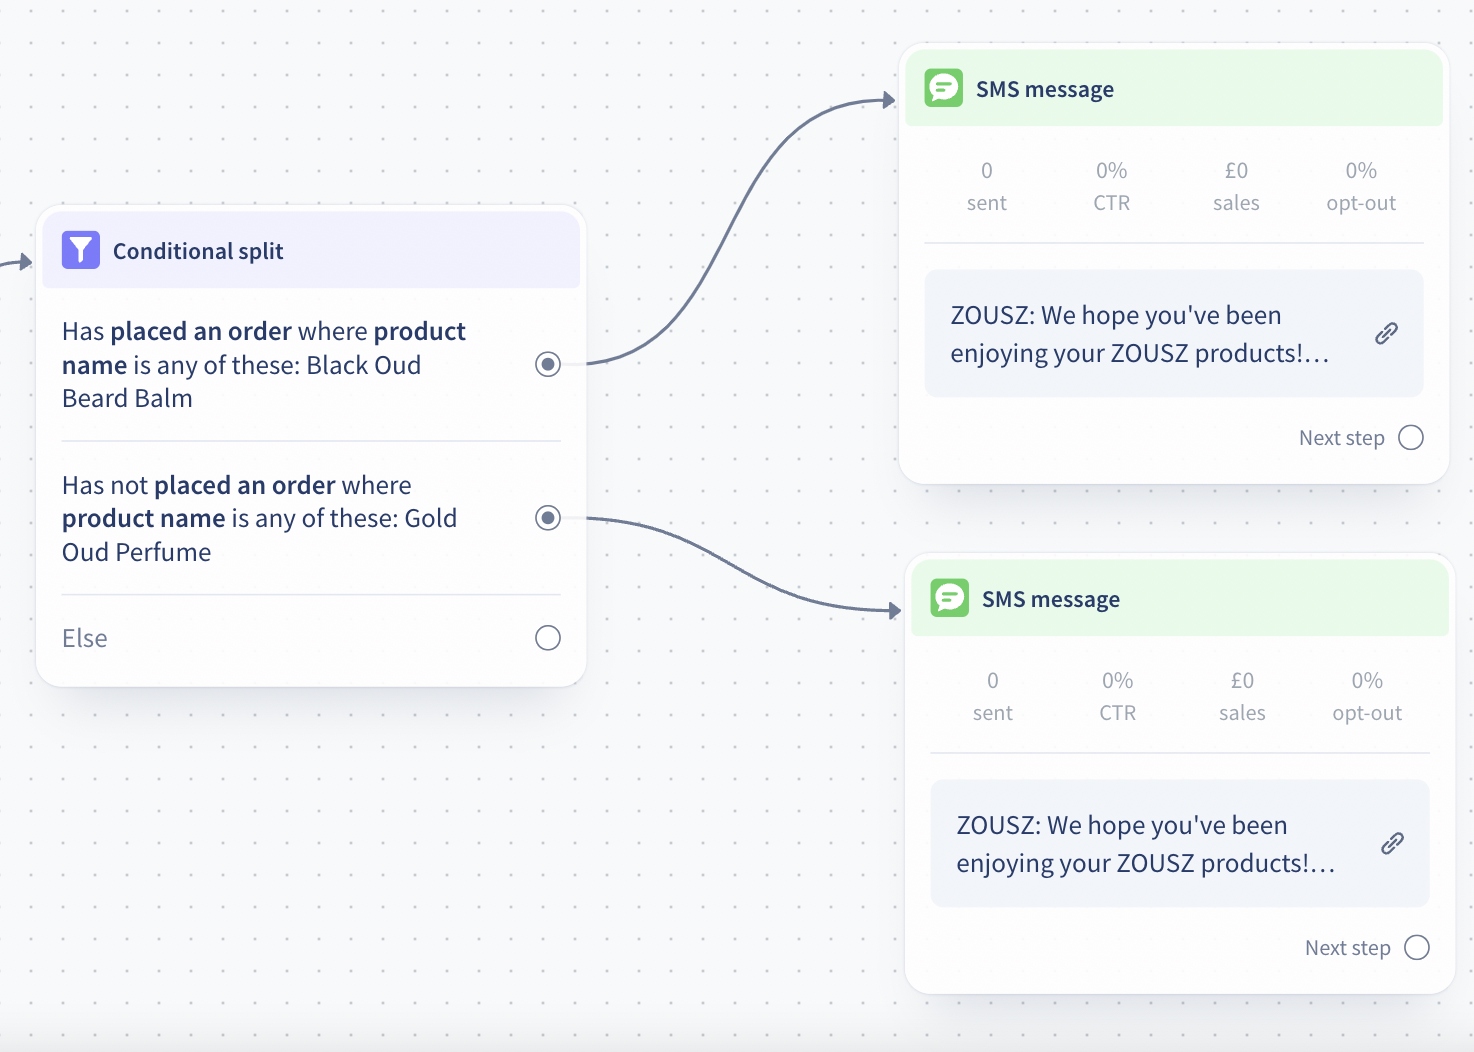
When the subscriber meets multiple conditions, they will receive the text that’s associated with the first condition met. The below example has two conditions, purchased Product A and purchased Product B. A subscriber may have purchased both products. In this case, they will receive the text associated with the first given condition met.
Conditional Split and Delay Dos and Don’ts
To make sure you segment your follow-up message properly, the order of the Conditional Split and the Delay in the flow is crucial. The timing of when subscribers meet certain conditions will determine which message they receive.
Dos ✅
If you use a Delay alongside the Conditional Split, make sure the Delay item comes before the Conditional Split within your flow.
In the below example, we would like to send a follow-up to only those who clicked on the link in the first text. The correct setup is the following: The first message is triggered, and the app should check if the user meets the given criteria with a 1-day delay, to make sure we include those who clicked right before we send out the follow-up text.

Don’ts ❌
Continuing this example, if you’d add the Conditional Split before the Delay, the app checks if the subscribers meet the criteria right after the first text is triggered. This will result in incorrect segmentation as it will exclude those who click on the link later, and those clickers will not receive the follow-up text.

How to apply multiple different delays in one flow properly?
When you’d like to send different follow-up messages with different delays you will want to apply the order of the Delay and Conditional Split described above. In the below example, we want to send different follow-up messages with different delays to subscribers based on the product they purchased. We want to apply 60 days delay when purchasing Product A, 80 days when purchasing Product B, C, or D, and 100 days when purchasing Product E. The correct setup is adding the 60 days delay first and connecting the next delay and text to the Else condition. The next delay should be 20 days because both added delays will add up. (60+20=80 days) Then again, by connecting 20 days delay to the Else condition we can trigger the correct follow-up at the right time to the subscribers we want to target.
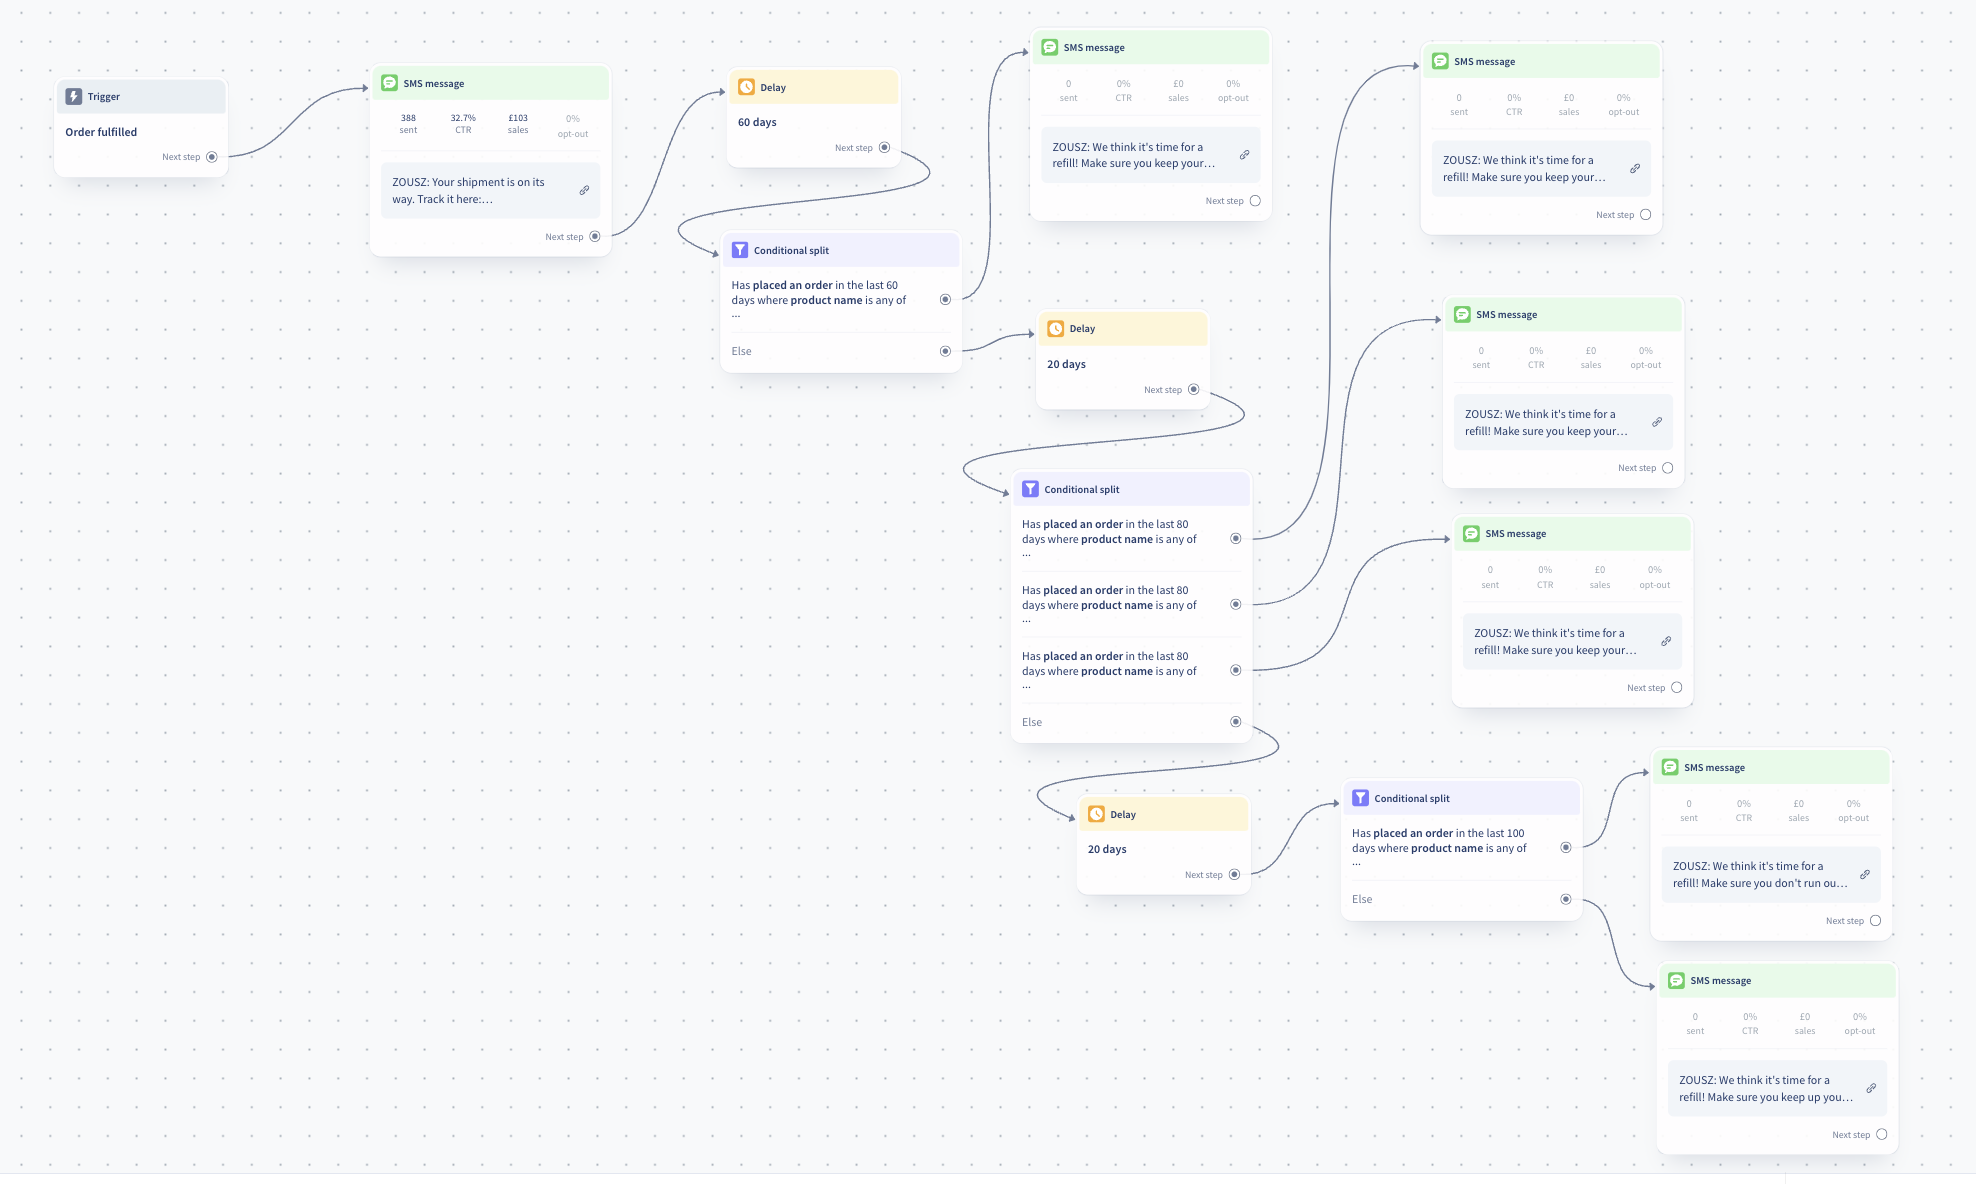
If you add the Conditional Split prior to the Delay, the segmentation will not be correct.
.png)
What type of Conditions can be used?
In the Conditional Split, you will have the option to use all the existing Segmentation filters and conditions. Check this article to view the full list.
Note that when you add conditions to Conditional Split within the flow editor, there will be no segment created, only that message’s audience will be segmented. If you’d like to create dynamic segments or static lists go to the Segment & Lists Page and follow this help article.
How will you benefit from using the Conditional Split?
-
Increased engagement
By sending targeted messages to specific groups of subscribers, you can increase their engagement with your brand. -
Improved conversion
With more relevant messages, subscribers are more likely to convert into customers. -
Time-saving
Conditional Split allows you to automate the process of segmenting your subscribers, saving you time and effort. -
Better ROI
By targeting the right subscribers with the right messages, you can improve your return on investment.
If you have any questions, do not hesitate to contact the Customer Support team.