Table of Contents
- What are Automated flows?
- What type of Automated flows can be activated in Recart?
- How to set up SMS Automated flows
- Welcome Messages
- Custom Triggers
- SMS Abandonment
- SMS Order & Receipt
- SMS Fulfillment Notifications
- SMS Help
- Integrations
What are Automated flows?
Automated flows are messages triggered by certain user actions and events.
What type of Automated flows can be activated in Recart?
- Welcome Message - triggered by the opt-in
- Custom Triggers - create personalized flows triggered by subscriber actions and events
- SMS Abandonment - triggered by abandoning products, a cart, or checkout
- Order & Receipt - triggered by placing/canceling an order
- Fulfillment Notification - triggered by fulfilling the order
- Help Message - triggered by the HELP keyword sent by the subscriber
How to set up SMS Automated flows
Navigate to the Automated flows page where you will find your SMS automated flows listed.
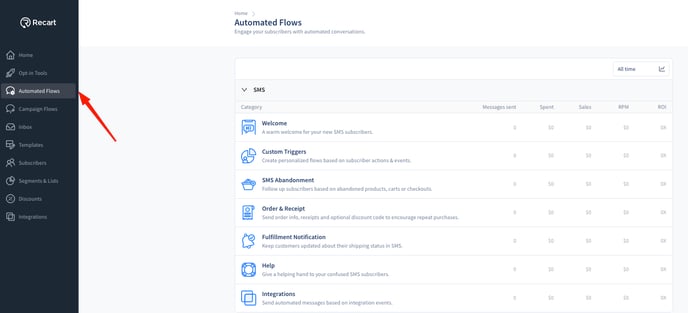
To activate them, you will need to click on them one by one.
Welcome Messages
There are 3 types of welcome messages differentiated based on the opt-in tools they are connected to.
All three welcome flows begin with a legal message. This cannot be edited or deleted as it is sent out in order to be compliant with regulations.
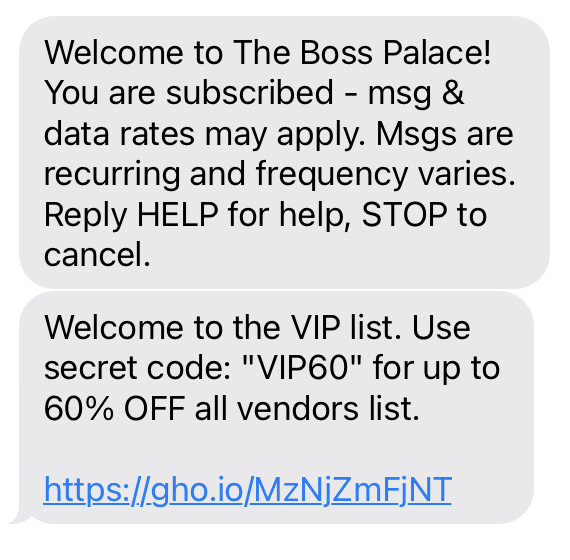
For more information and tips on SMS compliance and deliverability, please read this article.
Opt-in welcome messages
You can create multiple opt-in tools, and you can connect different welcome messages to them. Therefore the number of these welcome messages is unlimited. These messages will be sent when the visitors opt-in via the Opt-in tools connected to them.
When creating new opt-in tools, you need to connect a welcome message to them, and you’ll have the option to either create a new one or attach an existing one.
You can create a new welcome message if you go to the SMS Welcome messages page and click on Create new.
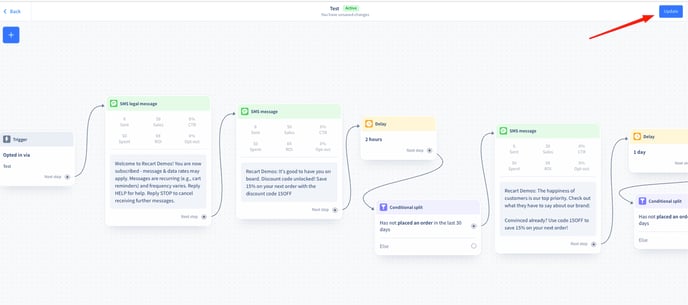
You will be redirected to the editor, where the default welcome message will appear.
Make sure you customize the messages according to your brand’s style.
- use your brand’s language
- add some educational content such as a business introduction, your vision, and your About page
- add your social media accounts to create visibility and collect more followers
- include images in the follow-up messages (it is not recommended to add images to the first message as MMS is more likely to be sent with a delay and the first item of the flow is time-sensitive.)
- the pre-set delays and conditions are our recommended settings, but you can change them
- we recommend sending three or more follow-up messages, but you can either remove or add more according to your brand’s needs
Once you are ready with the customization, click on the Save/Update button in the upper right corner.
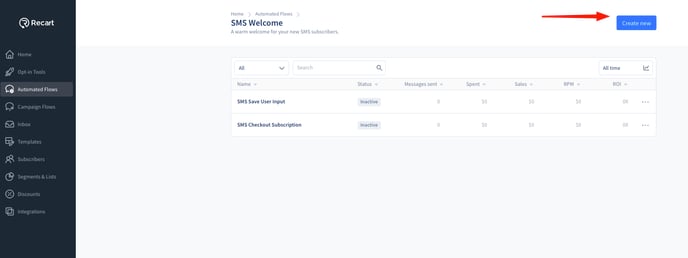
Saved welcome messages will appear on the SMS Welcome messages page.
In the Status column, you will either see Active or Inactive status next to these messages, depending on whether they are connected to an active opt-in tool or not. These types of messages can not be activated and deactivated manually, their status depends on their opt-in tool connection.
If you click on the three dots next to them, you will have the option to Rename or Duplicate these types of messages.
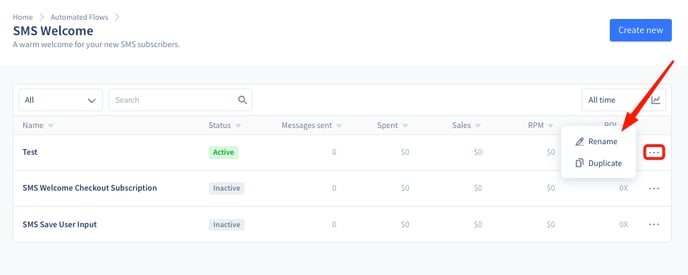
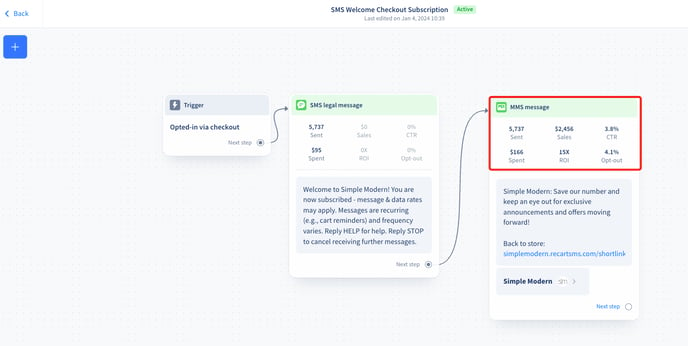
The SMS Welcome Checkout Subscription and SMS Save User Input welcome messages can not be duplicated as only one opt-in tool can trigger them. You can customize both of these within their editors. 👇
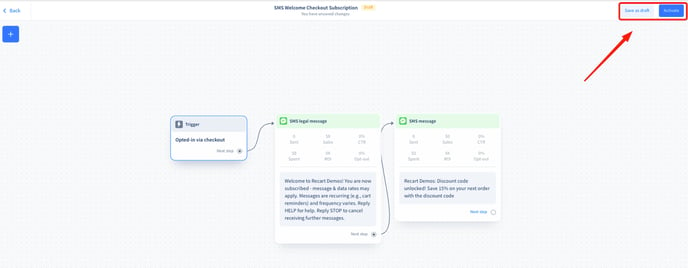
SMS Checkout Subscription Welcome Message
This message is sent automatically when someone opts in via your shop's Checkout page when submitting an order. You can Save and activate this message in the upper right corner of the editor.
Contact our support team if you need help enabling opt-in at checkout on Shopify.
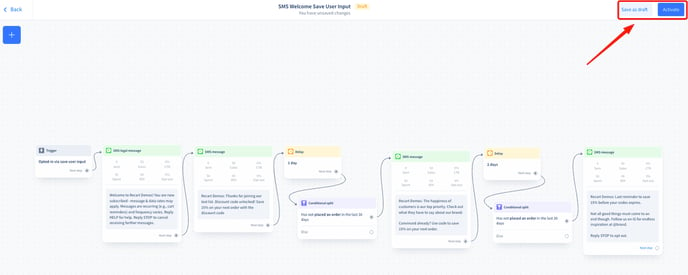
SMS Save User Input Welcome Message
This message is sent automatically when someone provides their phone number via Messenger, in a conversation where a phone number Save User Input is added. You can Save and activate this message in the upper right corner of the editor.
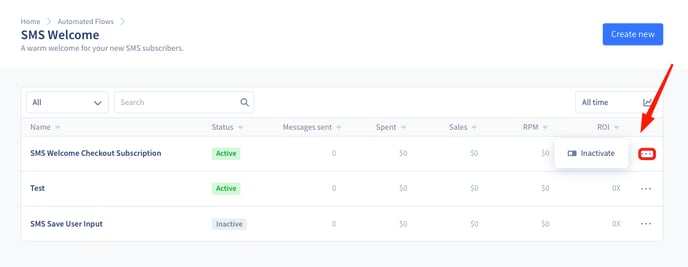
Unlike opt-in welcome messages, these messages’ statuses can be either active or inactive. Once these messages were saved and activated, you can change their status manually on the SMS Welcome messages page by clicking on the three dots next to them.
To receive the below automated messages the visitors need to opt into your list via any active opt-in tool.
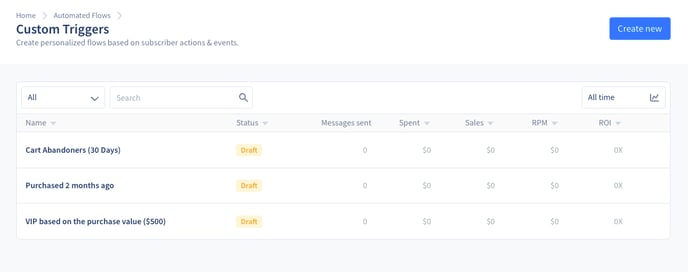
Custom Triggers
Custom Triggers is an automated flow triggered when the subscriber enters a specific segment. We assume you are familiar with our Segmentation feature, but if it’s not the case, please first check this article.
Custom triggers can be customized to suit your business’s specific needs and allow for great creativity! It is triggered by user action only when the subscriber’s behavior meets the conditions of the Segment.
You can activate any of our prebuilt Custom Triggers or create a new one once you have created the necessary segment.
Select a prebuilt Custom Trigger to edit the message to include your specific details.
Click on the Custom Triggers item to open the flow settings.
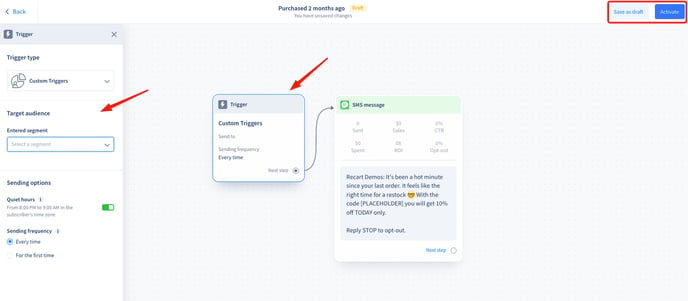
Here you’ll be prompted to finalize the below settings:
- Add the audience you’d like to target in the Send to section.
- Quiet hours are turned on by default to avoid bothering your subscribers. If the user is in Quiet Hours, the message delivery will be postponed. Learn more about Quiet Hours here.
- Set up the sending frequency. The message is either sent every time the user joins the Segment or only when the user enters the Segment for the first time.
When you are ready you can save the flow as a draft or activate it right away in the upper right corner.
Read more about how Custom Triggers work, or explore some of our Use Cases.
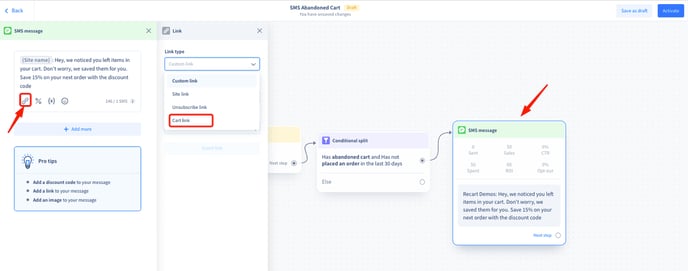
SMS Abandonment
Abandonment flows are SMS flows that you can set up to go to potential customers who have abandoned your site at various stages before purchase.
This category is subdivided into three types of abandonment:
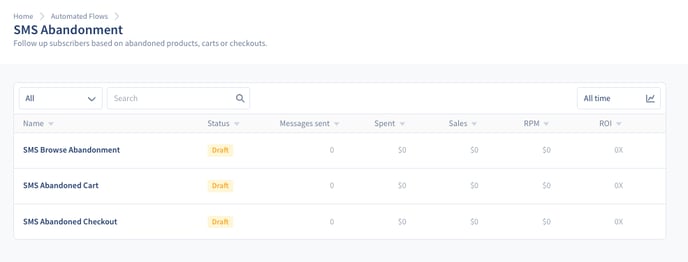
We highly encourage our merchants to turn on all 3 abandonment flows as each targets a different shopping stage.
You can get directly to the editor from the SMS Abandonment page by clicking on the flow’s name. You can customize the default message.
- You can add a discount code to reach a higher recovery rate.
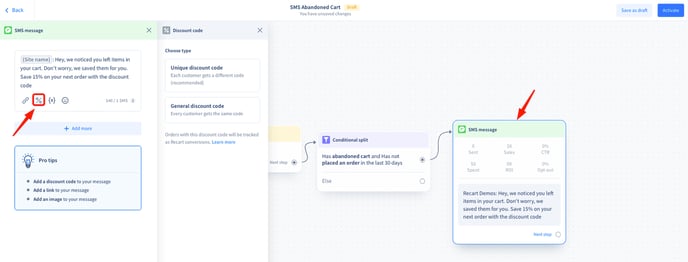
- You can add the specific URL variable to the message- cart link, product URL, or checkout recovery link. Clicking this link will direct the subscriber to the applicable page for them to continue shopping with ease.
- According to text marketing regulations, only ONE message can be sent regarding an abandoned cart or abandoned checkout, and it has to be sent within 48 hours of the abandonment. If you edit the default delay keep this in mind.
- For Abandoned Cart messages, we recommend keeping the default conditions in the message: 'Has abandoned cart' = true and 'Placed an order in the last 30 days' = false. This way we make sure only those will get the reminder who have items in their cart and have not purchased recently.
Once you are ready, you can Activate the message in the upper right corner.
You can read more about Abandonment Flows in this article.
SMS Order & Receipt
There are four order and receipt templates created for you to utilize once a customer places an order:
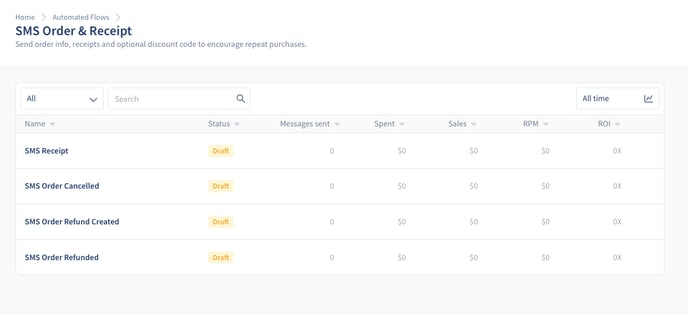
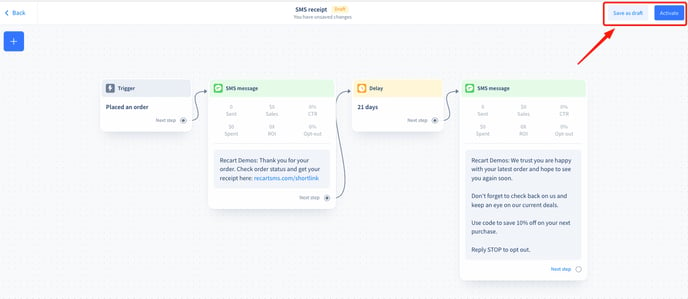
You can get directly to the editor from the SMS Order & Receipt page by clicking on the flow’s name. You can customize the default message if you would like to.
- In the first message, the Order status URL will direct the subscriber to the Shopify order status page.
- We recommend keeping the follow-up message to provide an incentive for the next purchase by adding a discount code
Once you are ready click on Save and Activate the message in the upper right corner.
SMS Fulfillment Notifications
There are eight default fulfillment notification templates for you to edit and use:
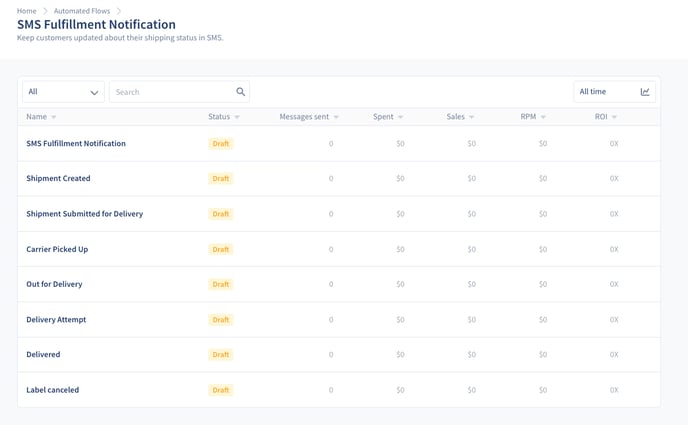
The SMS Fulfilment Notification is sent automatically to your customers when you fulfill their order within the Shopify Admin. You can get directly to the editor from the SMS Fulfilment Notification page by clicking on the flow’s name. You can customize the default message if you would like to.
- The Fulfillment tracking URL will direct the subscriber to Shopify order tracking page
Once you are ready click on Save and Activate the message in the upper right corner.
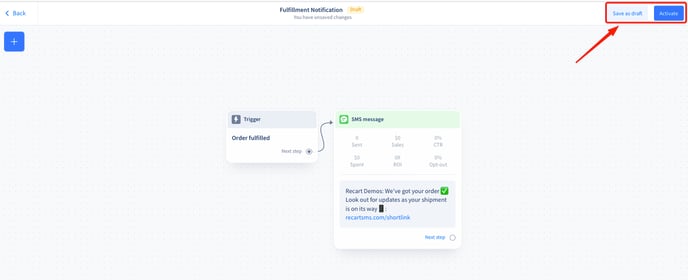
Read more about Recart’s Fulfillment Notifications here.
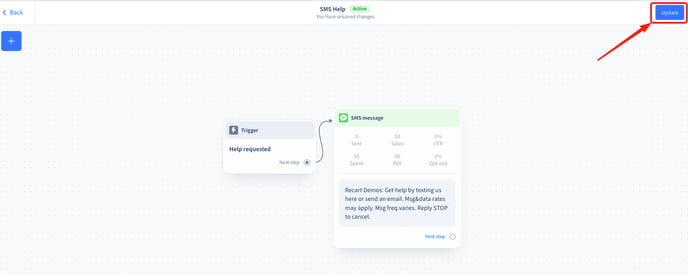
SMS Help
The SMS Help message is triggered by subscribers replying HELP to any of your previously sent messages. You can get to the editor directly from the SMS Help page and clicking on the flow’s name.
You can customize the message and once you are ready you can Update it in the upper right corner.
SMS Help messages are automatically activated when you start your Recart subscription and cannot be deactivated.
Integrations
Connect Recart to other apps to sync subscriber emails and phone numbers, use alternative checkouts, integrate with popups, and more.
Check out the integration page to see what integrations we currently have.
Automated flows statistics
You will find the statistics for all your automated messages on the Automated flows page.
- Messages Sent - This column will show how many subscribers received the message.
- Spent - Shows you how much money has been spent on the various categories.
- Sales - Shows you how much money you have made on the various categories.
- RPM - The return per message shows you the average return received in dollars per SMS sent.
- ROI - The return on investment shows you the rate of returns you’ve received from the money spent on SMS messages.
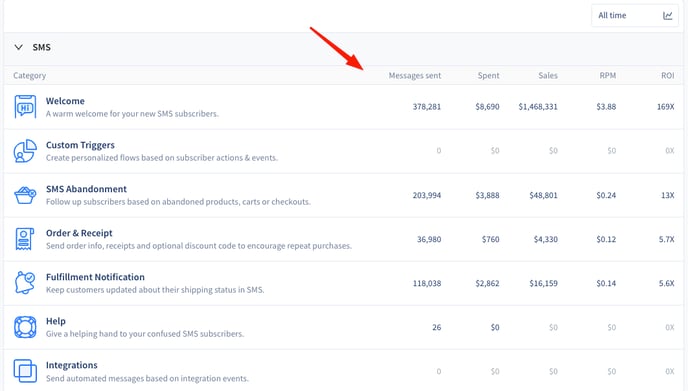
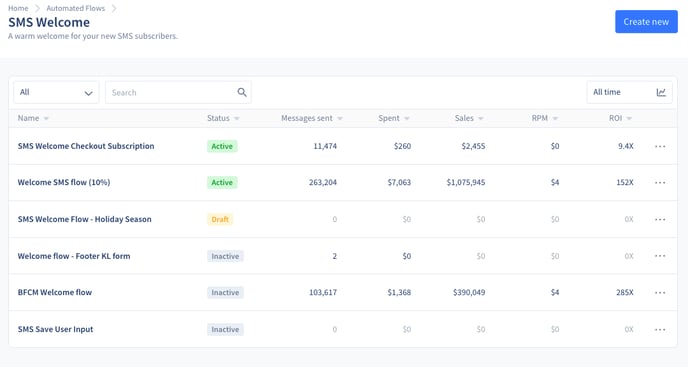
You can see the specific statistics for each SMS flow by going into one of the categories, for example, SMS Welcome.
You can find statistics per message displayed in each message’s editor on the top of the message items.
If you have any remaining questions, do not hesitate to contact the Customer Support team.