For a full reference of every editor option, see Customize and Manage Your Popup.
Table of Contents
- Before You Start
- Step 1: Create a New Popup
- Step 2: Add Your Offer
- Step 3: Customize the Success Step
- Step 4: Configure Settings
- Step 5: Save and Activate
- Step 6: Create Your OneClick Popup
- What's Next
Before You Start
Always keep a Welcome Popup and a OneClick Popup active at the same time. If a visitor clicks "This isn't me" on the OneClick Popup, Recart automatically shows them your Welcome Popup. Without an active Welcome Popup, that visitor leaves without subscribing.
💡 You can create and activate your Popup while your TFN application is being processed. You'll start collecting subscribers right away — messages will send once your TFN is approved.
Step 1: Create a New Popup

- Go to Opt-in Tools → Create New → Popup.
- Give your Popup a name (internal only — subscribers won't see this)

4. Choose your channel: SMS only, Email only, or Email + SMS.
5. For Email + SMS, choose your number of steps:
-
- One step — collects email and phone number on the same screen
- Two steps — email first, then phone number (recommended)
7. Pick a starting style.
Step 2: Add Your Offer
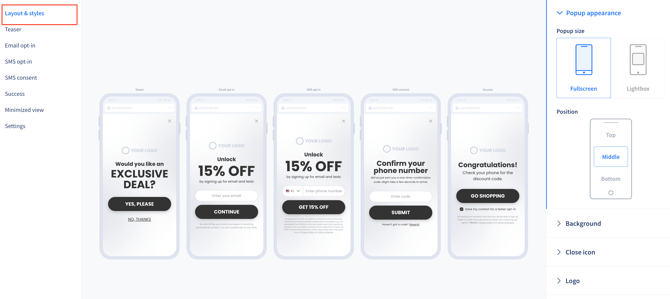
A clear offer is the single biggest driver of opt-in rate.
- Go to Layout & Styles in the left sidebar.
- Upload your logo and a brand image or GIF.
- Set your headline — make the offer immediately obvious (e.g. "Get 15% off your first order").
- Set your background color to match your brand.
- Customize your CTA button text and color.
Tip: Fullscreen Popups consistently outperform lightbox Popups. We recommend fullscreen as your default layout.
Tip: Keep the Teaser step on — it asks visitors to confirm interest before showing the full form. Testing has shown this increases overall conversion rates.
Step 3: Customize the Success Step
The Success screen is what subscribers see immediately after signing up — don't leave it as the default.
- Go to the Success section in the left sidebar.
- Update the heading and subheading.
- Set your CTA button action — choose one:
- Redirect to URL — send subscribers to a product, collection, or promo page
- Apply discount code — automatically apply their discount at checkout
- Add to cart — add a specific product to their cart instantly
- Append to URL — add parameters like a discount code to the current URL
📖 Customizing Your CTA Button in Popups
Step 4: Configure Settings
In the Settings section of the editor:
- Welcome Flow — connect a Welcome Flow. This is required; the Popup cannot be activated without one. If you haven't built your Welcome Flow yet, you can create one directly from this screen.
Note: A Welcome Flow's status is tied to the Popup it's connected to. If a Welcome Flow appears as Draft, it means the connected Popup is not turned on yet. Once you activate the Popup, the Welcome Flow will automatically turn on as well. Likewise, if you deactivate the Popup, the Welcome Flow connected to it will also be deactivated (provided it isn't used by another active Popup).
- Trigger — choose when the Popup appears:
- On page load — immediately or after a delay (recommended: 4–6 seconds)
- On exit intent — when the visitor shows intent to leave
- Re-engage — keep this on (recommended). It re-shows the Popup to visitors who previously dismissed it without subscribing, after a set period of active time.
- Pages — control which pages the Popup appears on:
- Show on specific pages — the Popup will only appear on the URLs you list here and will be hidden everywhere else on your store.
- Hide on specific pages — the Popup will appear everywhere on your store except the URLs you list here.
Note: We always recommend adding /cart and /checkout to your exclusions so the Popup doesn't interrupt visitors who are about to purchase.
- Geotargeting — choose which countries the Popup appears in. The default setup is fine for most stores.
Step 5: Save and Activate
- Click Save as active in the top-right corner.
- Open your store in an incognito/private browser window and confirm the Popup appears as expected.
Step 6: Create Your OneClick Popup
Once your Welcome Popup is active, go to Opt-in Tools → Create New → OneClick Popup.
The OneClick Popup recognizes returning visitors who've subscribed through any Recart-powered store and lets them opt in with a single tap — no typing required. Both Popups need to be running together.
What's Next
- Customize and Manage Your Popup — deep customization, targeting, A/B testing, and cookie behavior
- Popup Best Practices — design, copy, and compliance tips
- Set Up Your Welcome Flow
If you have questions, contact our Customer Support Team — we're happy to help.